
Few things match the satisfaction of mapping out your lawn care routine for a crisp Saturday morning, loading up your equipment, and preparing to feed your turf. But that momentum hits a brick wall the second you realize your equipment is leaving patchy, uneven streaks because the hopper openings are completely jammed. If you are watching granules bind up instead of dropping smoothly onto your grass, you are likely asking yourself: why is my drop spreader clogging, and how can I get things moving again before the morning dew burns off?
When I’m out in the yard prepping for a heavy seasonal push, I need my flow rates to be flawless. Drop spreaders offer unmatched precision around flower beds and walkways compared to rotary models, but their narrow gravity-fed exit ports make them highly vulnerable to blockages. If you routinely deal with clovers of damp product locking up your machinery, it often comes down to tool selection and environmental prep. Upgrading your setup to the Best walk behind drop spreader for damp fertilizer provides a much larger hopper gate and heavy-duty internal agitators designed to pulverize clumps before they cause an issue. However, even premium gear will fail if you overlook basic maintenance and product handling rules. Let’s look at the operational physics behind these jams and a systematic, practical breakdown to solve them fast.
Technical Anatomy: How Drop Spreaders Move Product
To understand why a machine stalls, we have to look under the hood. Unlike a broadcast spreader that throws material outward using a spinning impeller disc, a drop spreader relies entirely on straight gravity and mechanical agitation.
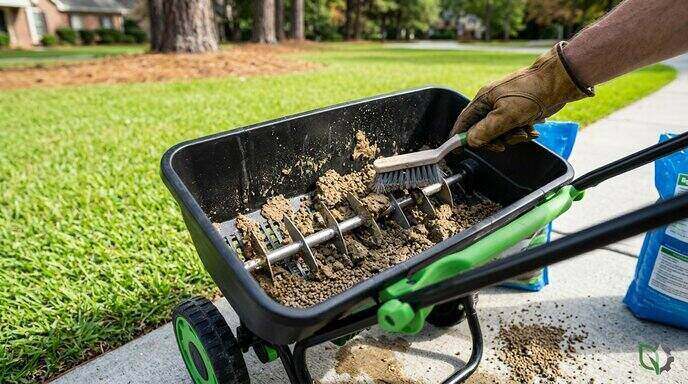
As you push the unit forward, the axle rotates a series of internal star-shaped wheels or tines (the agitator bar) directly above a row of small, precision-calibrated holes. The product falls through these specific openings in an exact vertical path. This design creates a perfect distribution pattern, but it introduces major mechanical vulnerabilities:
- Friction and Compaction: Granular fertilizer is highly hygroscopic—meaning it actively pulls moisture out of the surrounding air. When damp granules are squeezed through a small hopper gate, they flatten, stick together, and form a solid crust.
- Agitator Drag: If product hardens around the internal axle, the rotating tines can no longer spin freely. This causes your plastic drive gears to skip, meaning your wheels turn but the internal distribution mechanism remains completely frozen.
A Troubleshooting Guide to Clearing and Preventing Spreader Jams
If you are stuck mid-application with a jammed hopper, do not just shake the handle violently. You risk bending the internal flow-control calibration bars or stripping the drive gears. Instead, walk through these direct, problem-solving steps to diagnose and resolve the issue safely.
Step 1: Empty and Inspect the Hopper Cavity
Push the unit onto a tarp or a hard driveway surface—never perform a cleanout directly over healthy grass, or you will spill a concentrated pile of nitrogen that will instantly burn a dead brown hole in your lawn. Push the control lever to the fully closed position, dump the remaining dry granules back into their original bag, and inspect the interior bottom floor of the hopper.
Step 2: Chip Away Chemical Crusting
Look closely at the individual exit holes. In many cases, old fertilizer dust from previous seasons mixes with humidity to form a concrete-hard chemical crust over the openings. Take an old stiff-bristled toothbrush or a small wooden dowel and manually poke through each individual port from both the inside and the underside until the openings are completely clear.
Step 3: Check Calibration Gate Alignment
Look at the thin metal or plastic slide bar that moves horizontally when you open and close the handlebar lever. If the spring tension has loosened, or if a small pebble is wedged in the track, the gate won’t open all the way. This leaves a tiny, restricted gap that causes standard-sized lawn granules to bridge across the opening and jam immediately. Clean the track with compressed air or a wire brush, then apply a quick spray of dry graphite lubricant—avoid wet oils like WD-40 here, as they act like a magnet for fertilizer dust.
Step 4: Validate Agitator Engagement
Tip the empty spreader forward so the drive wheels are off the ground. Spin the main wheels manually with your hand. Watch the internal axle tines inside the hopper. If the wheels spin but the tines stay stationary, your drive pin or plastic axle gear is stripped or disengaged. If the axle does turn but feels incredibly stiff, you have packed debris wedged inside the outer axle bushings that needs to be cleared away.
💡 Pro-Tip: The Bucket Test for Moisture Control
Unsure if your fertilizer is too damp to run through a precision drop unit? Try the “clump test.” Grab a tight handful of the granules from the bag and squeeze your fist hard for five seconds. If you open your hand and the granules stay stuck together in a solid, doughy ball, the product has absorbed too much atmospheric moisture. Do not load it into your drop spreader. Instead, spread it out flat on a plastic tarp in the direct, dry afternoon sun for an hour to evaporate the excess moisture before attempting to apply it.
Critical Maintenance to Stop Jams Before They Start
The absolute best way to answer why is my drop spreader clogging is to look at your post-application cleanup habits. Fertilizer is inherently corrosive; leaving even a thin film of powder inside the machine guarantees a headache during your next weekend project.
- The Post-Use Blast: Never store your equipment with material still inside the hopper. Wash the machine inside and out with a high-pressure hose nozzle immediately after every single use. Focus heavily on flushing out the axle bushings and the slide-gate tracks where micro-dust loves to hide.
- The Hang-Dry Rule: After washing, leave the hopper control lever in the wide-open position and hang the spreader upside down on a garage wall hook or leave it out in the sun. Storing a wet or damp spreader in a dark garden shed creates a breeding ground for rust and causes residual dust to turn into permanent glue.
- Screen Your Material: If you are using budget-grade fertilizer or a bag that has been sitting open in your garage since last year, it likely contains large, hardened chunks. Always pour the product through a cheap piece of 1/4-inch wire mesh screen placed over the top of the hopper to catch large debris, stones, or paper bag fibers before they hit the exit gates.
By matching dry product with clean, well-lubricated gate tracks and maintaining a steady, brisk walking pace to keep your agitator tines spinning, you will achieve pristine, streak-free yard feeding without a single mid-job interruption.