
There is nothing quite as frustrating as pulling the starter cord on your yard tools only to hear the engine sputter, cough, and instantly die. You set aside a Saturday morning to clean up your lawn’s edges, but instead, you are left wrestling with a stubborn piece of machinery. When a small engine starts choking or refuses to idle, nine times out of ten, stale fuel has gummed up the fuel delivery system. Knowing how to clean a 2-stroke gas string trimmer carburetor is a fundamental skill that saves you an expensive trip to the repair shop and gets you back to manicuring your property in no time.
In my experience, these tiny carburetors are miracles of mechanical engineering, but their internal fuel passages are incredibly microscopic. A single speck of varnish from oxidized ethanol can throw off the delicate air-fuel ratio. If you are tired of dealing with fussy fuel systems altogether, it might be worth investing in the Best gas String trimmer with attachments, which often features modernized, easily serviceable carburetors and heavy-duty components built to handle the rigors of modern fuel. However, if your current power head is mechanically sound but just suffering from a clogged gut, a systematic deep clean will restore its factory snap. Let’s dive into a real-world teardown analysis of exactly why these components fail and how to clean them properly.
The Root Cause: Why 2-Stroke Carburetors Clog
To fix the problem permanently, we have to look at what is happening inside the aluminum body of the carburetor. Unlike a standard car engine, a 2-stroke lawn tool relies on a pulse-driven diaphragm system to pump fuel directly from the gas tank into the combustion chamber.
| Component | Primary Function | Clog Vulnerability |
| Primer Bulb | Manually draws fuel into the metering chamber for cold starts. | Can dry out, crack, or pull in fine airborne dust particles if torn. |
| Fuel Inlet Screen | A micro-mesh basket that catches debris before it enters the jets. | Easily blinded by fine black rubber particles from degrading fuel lines. |
| Metering Diaphragm | A flexible rubber membrane that regulates fuel flow based on engine vacuum. | Becomes stiff, brittle, and non-responsive when exposed to ethanol. |
| Main Jet & Emulsion Tube | Microscopic brass orifices that atomize the fuel mix. | Highly susceptible to gummy varnish layers left behind by stale gasoline. |
The ultimate villain here is almost always ethanol-blended pump gas. Ethanol naturally attracts moisture from the air. When that water-laden fuel sits inside a tiny aluminum carburetor bowl for more than three weeks, it undergoes chemical phase separation. The resulting varnish turns into a crusty white powder or a sticky green goo that completely chokes out the fuel jets.
Step-by-Step Guide: How to Clean a 2-Stroke Gas String Trimmer Carburetor
Before turning a single screw, clear off a clean, brightly lit workbench. Working on a dirty surface guarantees that lawn dust or grit will find its way into your freshly cleaned fuel circuits.
1. Safety First and Disassembly Prep
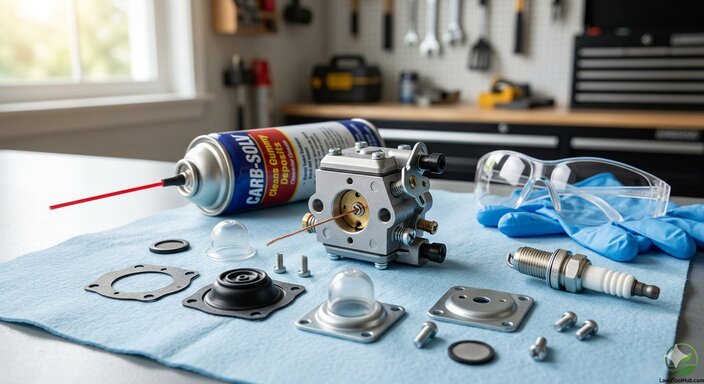
Safety is paramount when handling flammable liquids. Work in a well-ventilated space away from open flames or water heaters. Wear chemical-resistant nitrile gloves and wrap-around safety glasses—carburetor cleaner spray shoots out under high pressure and will cause a severe burn if it catches you in the eye. Snap off the spark plug boot to ensure the engine cannot accidentally fire. Remove the air filter cover, take out the foam element, and back out the two long bolts securing the air filter housing to the engine block.
2. Disconnect Fuel Lines and Throttle Linkage
Carefully slide the carburetor off its mounting studs. Note the configuration of the two fuel lines. The main delivery line brings fuel from the tank filter, while the return line sends excess gas back from the primer bulb. Slide a thin pair of needle-nose pliers over the fuel lines to gently twist and pull them off the carburetor nipples. Finally, tilt the carburetor body to unhook the metal Z-shaped throttle linkage rod from the throttle swivel arm.
3. Open the Diaphragm and Cover Plates
Lay the carburetor flat on a clean rag. Remove the single large screw holding the primer bulb assembly and plastic base plate in place. Lift away the rubber bulb and look for the tiny reed valves underneath. Next, flip the carburetor over and remove the four corner screws holding the metal metering diaphragm cover plate. Carefully peel away the rubber diaphragm and its matching paper gasket.
- Note: If the rubber diaphragm feels stiff like cardboard rather than soft and wrinkly, it is ruined and must be replaced using a cheap carburetor rebuild kit.
4. Flush the Internal Jet Orifices
Locate the tiny silver needle valve held down by a small rocker arm and spring. Do not remove this unless you have a rebuild kit handy, as that spring loves to fly across the garage. Now, grab a can of dedicated aerosol carburetor cleaner. Insert the straw directly into the fuel inlet nipple and give it a firm blast. You should see fluid spray cleanly through the internal passageways. Find the brass main jet holes inside the venturi (the center tunnel of the carb) and blast them directly.
5. Clear Stubborn Blockages with a Wire Filament
If a jet is completely seized with white aluminum oxidation or green lacquer, chemical spray alone won’t clear it. Strip a short 2-inch piece of copper wire from a standard household electrical cord. Take a single, ultra-thin strand of that copper wire and gently thread it through the brass jet holes.
- Critical Warning: Never use a hard steel sewing needle, drill bit, or safety pin for this step. Brass is incredibly soft, and steel will instantly scratch or enlarge the precision-drilled hole, permanently ruining the engine’s fuel metering calibration.
6. Dry, Reassemble, and Test
Use a can of compressed air to thoroughly blow out all residual solvent from every single passage, hole, and screen. Lay down the paper gasket first, followed by the flexible metering diaphragm, and secure the metal plate. Reattach the primer bulb, hook up your throttle linkage, and slide the fuel lines back onto their respective ports. Bolt the unit back onto the engine block, fill the tank with fresh fuel mixed with a high-quality fuel stabilizer, press the primer bulb five times to verify fuel is moving freely, and pull the cord.
By keeping your fuel fresh and executing this methodical cleanout whenever the engine acts sluggish, you’ll extend the lifespan of your trimmer and maintain a perfectly manicured lawn all season long.