If you are a lawn care obsessive like me, you know the absolute frustration of trying to grow a lush, thick carpet of turf on top of heavy clay soil. Clay is stubborn. In the heat of summer, it bakes into literal brick, suffocating grass roots and turning heavy rain into muddy, standing puddles. The secret weapon to saving your lawn is core aeration, but it leaves many homeowners staring down at their turf wondering: how deep should manual core aerator plugs be in clay?
When I’m out in the yard tackling tough, compacted turf, getting the depth right makes the difference between an incredibly vibrant lawn and a total waste of physical effort. If your plugs are too shallow, you aren’t actually relieving the pressure around the root zone. Let’s break down the exact depth you need to hit, the common mistakes that ruin your efforts, and how to conquer clay without breaking your back.
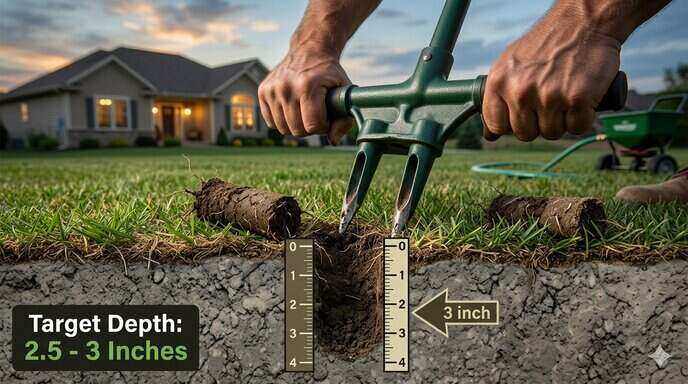
The Master Goal: How Deep Should Manual Core Aerator Plugs Be in Clay?
For heavy, compacted clay soil, your manual core aerator plugs should ideally be 2.5 to 3 inches deep.
Why is this specific depth the magic number? Most lawn grass roots—like Kentucky Bluegrass, Tall Fescue, and Perennial Ryegrass—concentrate the majority of their root mass within the top 3 to 4 inches of the soil profile. Clay packs tightly around these roots, cutting off oxygen, locking out nutrients, and causing water to run off instead of sinking in.
Pulling a clean, 3-inch plug punches right through that compacted top crust. It opens an immediate pathway for oxygen to reach the roots, lets slow-release fertilizers drop into the root zone, and creates perfect pockets for overseeding. If you pull plugs that are only an inch deep, you are barely scratching the surface and leaving the deep compaction completely untouched.
Achieving this can be a brutal workout if you use the wrong equipment. In my experience, choosing a heavy-duty manual core plug aerator for sticky clay featuring sharpened, hollow tines is the absolute best way to reach that optimal 3-inch depth without your tool instantly clogging with mud.
Case Study: The Broken Back and the 1-Inch Plugs
To understand how to get perfect depth, it helps to look at what happens when things go completely wrong. Last spring, my neighbor Tom decided to aerate his front yard. He had classic, heavy clay soil that hadn’t been touched in a decade. Armed with a cheap, straight-out-of-the-box manual tool, he marched onto his lawn on a bone-dry Saturday afternoon.
The Mistake: Bone-Dry Soil and Bad Leverage
Tom stood on his tool with all his weight, bounced up and down, and managed to push the tines barely an inch into the dirt. After two hours of back-breaking labor, his lawn looked like it had been lightly pricked with a fork. The plugs were shallow, crumbly, and completely ineffective. Even worse, the dry clay clogged the inside of his aerator tines, turning his core tool into a solid spike aerator that actually packed the soil tighter around the holes.
The Fix: Timing the Moisture Window
I stopped him before he ruined his afternoon. We hooked up his sprinkler system and ran it for about 20 to 30 minutes to deeply hydrate the top few inches of soil. Then, we waited exactly 24 hours.
The next day, the clay was no longer a brick; it felt like soft, pliable modeling clay. Tom stepped back onto his manual tool, and the sharpened tines glided down a full 3 inches into the turf with minimal effort. They pulled up beautiful, intact cylinders of soil that looked like earthworms resting on the grass.
Step-by-Step Guide to Getting Maximum Depth in Heavy Clay
Pulling deep plugs out of sticky clay requires a mechanical strategy, not just brute force. Follow this step-by-step blueprint to ensure you hit your depth targets every time.
Step 1: Check the Soil Moisture (The Screwdriver Test)
Never aerate dry clay. Take a standard 6-inch screwdriver and push it into your lawn. If it won’t go in at least 3 inches without immense pressure, your soil is too dry. Water your lawn thoroughly the day before you plan to aerate. You want the soil damp, but never sloppy or muddy.
Step 2: Clear the Lawn Surface
Mow your grass slightly shorter than your usual cutting height—around 1.5 to 2 inches is ideal. Rack up any heavy thatch or fallen leaves. Short grass prevents your manual tool from getting hung up on top of the turf blades, ensuring the tines make direct contact with the soil crust.
Step 3: Apply Even, Vertical Pressure
Position the aerator completely perpendicular to the ground. Place one foot squarely in the center of the footbar. Step down using your core body weight to drive the tines into the ground. Avoid rocking the tool wildly from side to side to force it down; this distorts the shape of the hole and can bend your equipment.
Step 4: Eject and Clear
As you lift the tool straight up, the plug should slide smoothly out of the top of the tine as the next plunge occurs. If the clay is incredibly sticky and clogs the tool, keep a large finish nail or a screwdriver handy to quickly push the blockage out from the bottom.
Pro-Tip: Don’t Bag Your Plugs!
Once you finish pulling those glorious 3-inch plugs, leave them sitting right on top of your lawn. Let them dry out for a few days. When you mow over them, they will crumble back down into the thatch layer. This introduces beneficial soil microbes directly to the surface to help naturally decompose thatch and improve your overall soil structure.
Essential Safety and Tool Maintenance Checklist
Manual aeration is a heavy physical task, and clay puts extreme stress on your tools. Keep these safety and maintenance rules in mind to protect your body and your gear:
- Locate Irrigation and Utility Lines: Before punching 3 inches into the earth, map out your shallow irrigation lines, invisible dog fences, or shallow cable wires. Piercing a PVC sprinkler pipe ruins your weekend instantly.
- Sharpen the Tines Regularly: Dull tines push clay sideways instead of cutting through it cleanly. Use a round file or a rotary tool to hone the cutting edges of your hollow tines before starting.
- Lubricate the Internal Tine Walls: Spray the inside and outside of your hollow tines with a quick burst of silicone spray or WD-40. This creates a slick surface that prevents sticky clay from adhering to the metal and causing structural clogs.
- Protect Your Lower Back: Keep your spine neutral when stepping on the footbar. Let your leg muscles and body weight do the heavy pressing, rather than forcing the tool down with your arms and lower back muscles.
FAQs
What happens if my core aerator plugs are too shallow?
If your plugs are under 2 inches deep, you are only relieving compaction in the very top layer of thatch and soil. The dense clay below continues to restrict root growth, meaning your grass will remain shallow-rooted and highly vulnerable to drought stress in the summer.
How often should I aerate a lawn built on heavy clay?
For severe clay soils, I highly recommend manual core aeration twice a year—once in the early spring as the lawn wakes up, and once in the early autumn during peak overseeding season. Once your soil structure begins to loosen up and accept nutrients, you can drop back to an annual autumn session.
Should I topdress the holes after pulling 3-inch plugs?
Yes! This is the absolute best time to improve your soil profile permanently. After pulling your plugs, spread a thin, quarter-inch layer of high-quality organic compost or fine masonry sand across the lawn. Raking this compost down into those open 3-inch holes permanently alters the composition of your clay, creating a dark, rich loam over time.