We’ve all been there. You drop a freshly topped-off battery into your tool, click it into place, and head out to the driveway to carve out some crisp, beautiful borders. For the first few feet, it’s pure bliss. But the moment you hit that dense patch of overgrown turf where the sidewalk meets the lawn, the motor groans, stalls out, and your battery indicator drops from three solid green bars down to a flashing red light. If you just upgraded to a premium battery lawn edger kit with a charger, this sudden power drain can be incredibly frustrating. It makes you feel like you bought a defective tool or a bad batch of lithium-ion cells.
When I’m out in my own yard tackling early spring maintenance, I deal with the exact same stubborn, dense root networks. If your machine keeps cutting out prematurely, the problem usually isn’t a broken tool. It’s a matter of understanding exactly how lithium-ion cells handle extreme electronic resistance. Let’s dig into the mechanical reasons why does my cordless edger battery die quickly in thick grass, track down the sneaky culprits draining your runtime, and look at the step-by-step corrections to make your charge last twice as long.
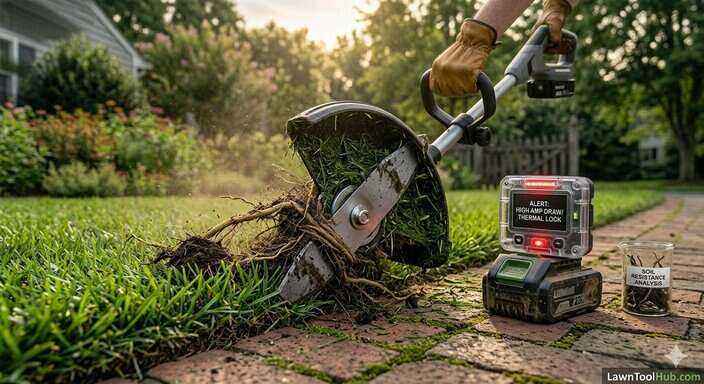
5 Reasons Why Your Cordless Edger Battery Dies Quickly in Thick Grass
When a spinning steel blade hits a wall of overgrown, tightly knit grass blades and compacted topsoil, it triggers a chain reaction inside your tool’s electrical circuit. Here is a breakdown of what is actually happening under the hood.
1. High Amp Demands and Overcurrent Draw
Your cordless tool uses an internal electronic speed controller to keep the blade spinning at peak RPMs. When dense turf slows down the blade, the motor demands massive amounts of current (amperage) from the battery pack to keep from stalling. This aggressive, sustained electrical draw drains lithium-ion cells up to four times faster than light trimming across pre-cut borders.
2. Excessive Thermal Build-Up (Heat Saturation)
Thick grass stems rub against the sides of the spinning blade, generating intense frictional heat. Lithium-ion batteries have built-in Thermal Overload Protection circuits. When the cell internal temperature crosses approximately 60°C (140°F), the battery will automatically shut down to prevent permanent cell degradation, even if it still has 40% of its chemical capacity remaining.
3. Packed Debris Inside the Guard Cavity
Take a look underneath your tool’s protective safety guard. Dense, moist turf clippings like Bermuda or St. Augustine tend to pulverize into a sticky paste that welds itself to the inside walls of the cutting deck. This sludge constantly rubs against the spinning arbor, creating an invisible braking mechanism that strains the motor during every single second of runtime.
4. Dull or Severely Rounded Blade Profiles
An edger blade doesn’t cut quite like a razor-sharp lawn mower blade, but it still requires a crisp, clean squared-off edge to chop through root masses cleanly. When the tips of the blade wear down and become rounded like an oval, the tool stops cutting and begins beating the grass through brute force. This dramatic increase in friction tanks your battery efficiency.
5. Deep Plunging Techniques
If you drop the depth adjustment wheel all the way down to its lowest setting on your first pass of the season, you are forcing the blade to plow straight through stones, packed soil, and old roots simultaneously. This turns your lightweight yard tool into an impromptu trenching machine, which will kill almost any standard residential battery pack within five to ten minutes.
The Pro-Active Troubleshooting Guide: Resetting Your Runtime
If you want to stop the constant stalls and get back to enjoying your lawn care sessions, implement this sequential troubleshooting routine next weekend.
Step 1: Isolate and Clean the Cutting Mechanism
Remove the battery pack entirely from the tool before servicing. Grab a stiff-bristled wire brush or a flat plastic putty knife and thoroughly scrape away every last bit of dried, packed-on mud and grass fiber from the inside of the blade guard assembly. Spin the blade by hand to make sure the shaft turns freely without any internal resistance or rubbing sounds.
Step 2: Swap Out or Square Off the Blade
Examine your cutting steel. If it looks heavily rounded at the corners or has shrunk by more than an inch in overall diameter, replace it. If the blade is still full size but simply blunt, use a flat mill file to clean up the leading edges, keeping the profile completely square. A fresh, clean edge cuts through thick grass stalks instantly, dropping your motor’s amp draw back down to normal operational baselines.
Step 3: Implement the Multi-Pass Depth Strategy
Never attempt to cut a deep, $2\text{-inch}$ trench through thick grass borders on a single pass. Raise your tool’s depth wheel to its shallowest setting for your first run to skim off the top layer of overgrowth. Once the initial line is cleared, drop the depth wheel down by half an inch and make a second pass. This incremental approach keeps the motor running cool and preserves your battery’s precious cell capacity.
Step 4: Let the Motor Reach Full Operational Velocity
Do not press the tool’s blade directly into a thick wall of grass before squeezing the throttle trigger. Pull the trigger while the blade is suspended completely free in the air, allow the electric motor to spool up to its maximum RPMs, and then guide it smoothly forward into the cutting zone.
Step 5: Adjust Your Walking Pace
Listen closely to the pitch of the electric motor. If you hear a deep, low-pitched groan, you are walking too fast and shoving the blade forward quicker than it can clear material. Slow your walking speed down down to a gentle crawl, allowing the blade to cleanly slice away small fragments at high speed without bogging down the rotational axis.
💡 Pro-Tip: The Cool-Down Rule
If your battery pack stops working and feels hot to the touch, do not immediately slide it onto your diagnostic battery charger. High-speed chargers will refuse to pump juice into a thermal-locked battery to prevent fires. Let the battery sit inside a shaded, air-conditioned workspace for 20 minutes to cool down to room temperature before attempting to recharge or run it again.
Frequently Asked Questions
Will upgrading to a higher Amp-Hour (Ah) battery stop the tool from stalling out?
Yes, absolutely. Think of Voltage ($V$) as the raw horsepower of your tool, while Amp-Hours ($Ah$) represent the physical size of the fuel tank. A larger $5.0\text{ Ah}$ or $6.0\text{ Ah}$ battery pack features more individual rows of internal cells wired in parallel. This allows the battery to distribute heavy current loads evenly across multiple cells, preventing voltage drops and doubling your runtime in demanding, thick grass conditions.
Can I use WD-40 inside the blade guard to stop wet grass from sticking?
You can apply a light misting of silicone lubricant spray or non-stick cooking spray to clean plastic guard interiors, but avoid heavy oils or standard WD-40. Thick, sticky oils will actually attract fine dirt particles and sand grains during operation, forming an abrasive lapping compound that can ruin your arbor seals and accelerate blade wear.
Is it better to edge my lawn when the soil and grass are dry or wet?
Always wait for your yard to dry completely before using a cordless edger. Wet grass clump fibers adhere to the cutting assembly with extreme tenacity, and damp soil is significantly heavier and denser than dry earth. Edging dry turf minimizes structural drag against your tool’s electric motor, giving your battery the best possible chance at surviving a full property sweep.