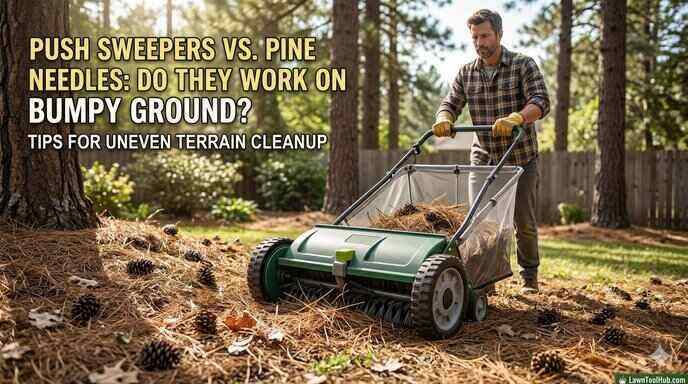
There is nothing quite like looking out over your yard and seeing a clean, immaculate carpet of green turf. It makes all the sweat equity worth it. But if your property is lined with mature white pines or scotch pines, you know that keeping it pristine is an absolute nightmare. When I’m out in the yard during the heavy autumn drop, raking those slick, acidic needles by hand feels like an endless chore that ruins your lower back. If your yard has dips, ridges, or a noticeable slope, you are likely asking a very practical question: do push lawn sweepers work on uneven terrain with pine needles, or will the wheels just spin uselessly in the dirt?
The short answer is yes, they do work—but only if you understand how to adjust your equipment to handle the micro-topography of your soil. Investing in a heavy-duty walk behind lawn sweeper for pine cones and needles can save you hours of grueling labor, but uneven ground introduces unique mechanical challenges. Because a push sweeper relies on ground-driven wheels to spin its collection brushes, sudden dips can lift the unit right off the turf, while high spots can cause the brushes to dig in and stall out. Let’s look at the actual mechanics of sweeping bumpy ground, break down what goes wrong, and map out exactly how to optimize your setup for a frustration-free cleanup.
The Anatomy of Failure: What Slopes and Swales Do to Sweeper Brushes
To get the most out of your equipment on bumpy ground, you need to understand how topography throws a wrench into standard lawn sweeping mechanics. When you roll a push sweeper across a perfectly flat lawn, the wheels turn at a constant speed, transferring that rotational energy smoothly through an internal gear assembly to spin the collection brushes at a 4:1 or 5:1 ratio.
However, when you introduce tree root ridges, grading dips, or gentle swales, three specific mechanical problems occur:
- The High-Spot Stall: When the sweeper encounters a sudden high ridge or mound, the lower brush assembly hits the earth with excessive force. Instead of flicking debris backward into the hopper bag, the brush bristles smash directly into the turf, instantly locking up the axle and causing the plastic drive wheels to skid across the grass.
- The Low-Spot Skim: When the front wheels drop into a minor depression or dip, the center of the brush housing stays elevated above the lowest point of the hole. Because the bristles cannot reach down into the void, they slide cleanly over the top of the debris, leaving a thick mat of nested pine needles completely untouched.
- Traction Loss on Slopes: Push sweepers are remarkably lightweight. When you are pushing across a side-hill slope, the weight shifts entirely to the downhill wheel. The uphill wheel loses solid contact with the soil, starts slipping, and causes the brushes to pulse or stop spinning entirely.
Step-by-Step Optimization Guide: Mastering Bumpy Pine Cleanups
You don’t need a perfectly graded lawn to keep your turf clear. By altering your pathing and making micro-adjustments to the machine’s configuration, you can force a standard sweeper to hug the contours of your yard beautifully. Here is the exact methodology I use to tackle problematic properties.
Step 1: Mow the Grass Slightly Lower Before Sweeping
Long, overgrown grass blades act like defensive fingers that wrap around fallen pine needles, weaving them into a tight mat that brushes cannot easily dislodge.
- Drop your mower deck down by one notch—roughly to 2.5 or 3 inches—and clear the area before you sweep.
- This stands the needles up vertically and shortens the turf canopy, allowing the sweeper’s bristles to make direct, high-impact contact with the debris without getting bogged down by dense green top-growth.
Step 2: Set Your Brush Height via the “Two-Finger Rule”
The single biggest mistake homeowners make is slamming the brush height adjustment knob down to its lowest setting, assuming it will scrape the lawn clean. This ruins the gears and tears up your grass roots.
- Wheel the sweeper onto a flat section of your yard.
- Adjust the height knob until the tips of the brushes sit roughly one to two finger-widths below the very top of your grass blades.
- The bristles should only flick the top half of the turf canopy. This precise clearance gives the unit enough mechanical buffer room to glide over sudden high spots without burying the axle or locking up the drive wheels.
Step 3: Change Your Angle of Attack (The Contour Method)
If you push a sweeper straight up and down across deep ridges or swales, the machine will constantly bounce and skip, missing chunks of debris.
- The Technique: Change your pattern and tackle the terrain diagonally or perpendicular to the slope.
- By running the sweeper along the side of a ridge rather than over it, the two main drive wheels remain planted at a relatively level altitude. This keeps the brush drum spinning at a constant, high velocity, allowing the outer edges of the bristles to cleanly scoop up nested needles along the incline.
Step 4: Increase Your Ground Speed and Maintain Momentum
Because push sweepers do not have onboard gas engines or electric battery packs to turn the brushes, your walking speed dictates your cleaning power.
- Do not casual-stroll through a heavy patch of pine debris.
- Maintain a brisk, athletic walking pace. High forward momentum creates intense centrifugal force at the brush tips, which is exactly what you need to lift long, interlocked needles out of shallow ruts and sling them cleanly into the rear collector hopper.
Pro-Tip: The Weight Modification Trick
Because push sweepers are primarily constructed out of lightweight molded plastics and aluminum tubes, the drive wheels can easily bounce off the ground when hitting rough bumps. To combat this traction loss, wrap a 5-pound or 10-pound vinyl barbell weight or a heavy brick securely to the front crossbar of the sweeper frame using heavy-duty zip ties or a bungee cord.
This extra localized down-force pins the drive tires firmly against the turf, ensuring they keep traction and spin the internal gear system even when rolling over uneven roots or slick pine cones.
Crucial Tool Maintenance for Needle Cleanups
Pine needles are unique because they are loaded with sticky, viscous resin that transfers onto tools. If you are running your sweeper through damp conditions, this sap will mix with fine dirt and form a thick paste inside your equipment.
- De-Gunk the Axle Bushings Regularly: After every two or three uses, flip the sweeper over and check the outer ends of the brush drum. Long pine needles love to wrap tightly around the spinning axle spindle, migrating into the wheel gears. Slice these away with a utility knife to keep the internal bearings running free.
- Avoid Water-Logged Needle Mats: Never attempt to sweep up pine needles immediately after a torrential downpour. Wet needles stick together like glue and become incredibly heavy. Pushing through water-saturated piles will overload the hopper bag and wear out your internal plastic gears prematurely. Wait for a dry, breezy afternoon when the needles are light and loose.